This blog site will be going away soon.
Please go to http://photographerteacherartist.blogspot.com/ in the future
Saturday, June 29, 2013
Tuesday, February 19, 2013
February Style It Challenge
 Another month, another challenge!
This time the challenge that +lane langmade and +Shantha Marie Fountain set before us was Fantasy with the added challenge of Natural Light!
Well, I only ever use natural night... I have no lighting equipment or anything like that, but I know that my lighting techniques need a lot of work! So off to research I went!
I found out how to make my own reflector at home, so that is something that I will endeavor to do.
I called up my two go-to models, Maggie and Jill, and asked if they were interested. I set the photo shoot date for February vacation, where I will have more time and so will they since we all work in education! They confirmed their interest.
Then it was time to decide WHAT to do.
 |
| This was my original idea scribble. |
Next, OFF TO PINTREST! Time to search through images of fantasy photos and tutorials for levitation. I already know *generally* how to do it, but it doesn't hurt to find a tutorial.
AND THEN that happened! I had grandiose plans, an idea I was really excited for... BUT we signed on a fantastic townhouse and have about 2 weeks to pack up and move. The hasty packing and moving process meant that my photo plans had to be put aside for the time being. I totally plan to try this idea out later on, I am still excited about it. Now is just not the time.
I was wicked bummed that I wouldn't have a photo to submit this month. On a packing break I decided to go through some of my unprocessed photos to see if there was anything I could use for this fantasy/natural light challenge. Like I said earlier, most of my photos are using natural light, so that would not be much of a challenge. And the photo shoots I did with my two models were all fantasy-ish. Not too bad. Searching through I found a couple possibilities.


So this is actually from the same photo-shoot as my January submission. My model, Maggie, was doing her steam punk thing. Towards the end of the day we started getting silly. I set my camera on long exposure around sunset and Maggie walked towards the camera. It created a ghosting effect. I manipulated the photo in Lightroom. I put it into two-tone with brown and cream. I added vignetting and increased the grain on the photo to make it look older. I decided to call it The Haunted River Walk.
AND THEN that happened! I had grandiose plans, an idea I was really excited for... BUT we signed on a fantastic townhouse and have about 2 weeks to pack up and move. The hasty packing and moving process meant that my photo plans had to be put aside for the time being. I totally plan to try this idea out later on, I am still excited about it. Now is just not the time.
I was wicked bummed that I wouldn't have a photo to submit this month. On a packing break I decided to go through some of my unprocessed photos to see if there was anything I could use for this fantasy/natural light challenge. Like I said earlier, most of my photos are using natural light, so that would not be much of a challenge. And the photo shoots I did with my two models were all fantasy-ish. Not too bad. Searching through I found a couple possibilities.


In the end I went with the most simple one, and the one that took me the least amount of time... because it just looked the best. Sometimes simple is best. At least when you are short on time, energy, and brain power!
My submission:
So this is actually from the same photo-shoot as my January submission. My model, Maggie, was doing her steam punk thing. Towards the end of the day we started getting silly. I set my camera on long exposure around sunset and Maggie walked towards the camera. It created a ghosting effect. I manipulated the photo in Lightroom. I put it into two-tone with brown and cream. I added vignetting and increased the grain on the photo to make it look older. I decided to call it The Haunted River Walk.
Monday, January 21, 2013
January Style It Challenge
Google + has a new feature, Communities.
I have joined in a few photography communities, primarily ones that issue weekly or monthly challenges. It is nice to have an assignment or a goal to reach.
One group is a Style It, Shoot it, Share it group, where you have to design and style a photo and then manage to make it happen.
To be honest, January is a bad month for me. It is busy at work, it is my birthday, my stepdad's birthday, and it was my dad's birthday which is always a rough day for me. In addition to being busy with those things, I got the flu (despite getting a flu shot!!) and was out of commission for a week. I got a late start on this challenge. I didn't start it until a week before it was due. Oops!
So the challenge was to create a photo that includes two elements, apocalypse and a created background. I had NO idea what a "created background" really meant, luckily one of the lovely moderators, Lane Langmade, and some others in the group got right on that to help me understand. There are a few types of "created" backgrounds, modify an existing background, create a background, or composite a background digitally.
I decided to push myself and learn how to digitally composite.
Another aspect of this community is that you are encouraged to share HOW you accomplished your photo. That is where this blog entry comes in!!
Here is my finished shot:
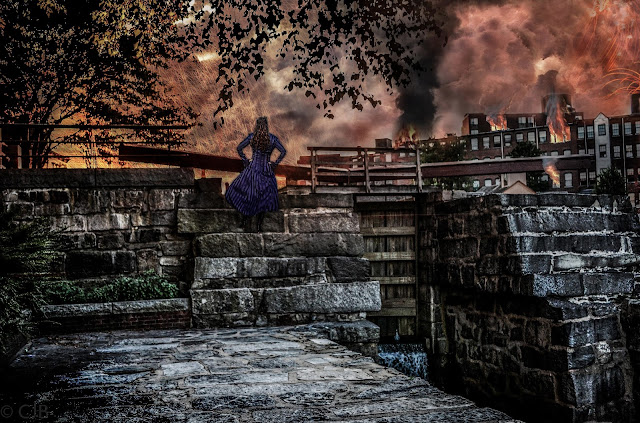
The picture is primarily two photos with bits and pieces of a few others added in for effect. The two main photos are these ones:


I took these photos a few months back. The model is a friend Maggie, epic costumer geek and filled with awesome. This is her Steampunk reporter character and the shoot was a lot of fun. We roamed all over the old mill city of Lowell and used the old mill buildings as a backdrop.
I grabbed some smoke and fire photos from google images and took just tiny slices off of them. I didn't have any photos that would work for those in my repertoire. I did have a few "burning embers" type photos that I used for fire raining from the sky and explosion type effects. These two photos are from a number of months ago. They are of my friend Kitch playing with steel wool. That was a lot of fun, and gladly nobody called the cops on the group of people playing with fire in the parking lot.


As I was working on the photo composition, adding things in together and processing, I went through a few stages. There were a couple times that I thought, this is good, I think I might be done. Then I decided that I was not and kept going. This may or may not be for the best...


Monday, September 3, 2012
Selfy-Sunday meets Doctor Who!
Whoo! Back to school has been kicking my butt! The last 2 weeks have been non-stop school stuff. I have a GIANT backlog of photos to process and more to come soon for the Chrysta Rae Photography Scavenger Hunt on G+!
I took a little time out of my Sunday for my by-monthly Selfy-Sunday photo! Every two weeks, on G+, there is a Selfy-Sunday photography event. Sometimes there is a prompt or challenge to do, sometimes not. This time they were trying out a new submission system so that was the focus, no theme. So I gave myself a theme!
DOCTOR WHO! If you do not know Doctor Who then you need to go and educate yourself! Doctor Who is a show that started in the 1960's and has had a number of re-boots since then. The latest re-boot started in 2005 and it is AWESOME! A few years ago a couple friends of mine were shocked that we had never seen Doctor Who. They grabbed a couple seasons, shoved them at us, and told us we were not allowed back into their house until we've watched them! If we didn't like it, fine, but we needed to at least see it. We were hooked! And it turned out, I had seen the show before! When I was living in Scotland we had a little TV in the common area of our flat. It did not always work. But one time it DID and I watched a really interesting show, but was never able to figure out what I was watching. When we got a few seasons in I saw the episode that I had watched years earlier.
Now my husband and I convert others into Whovians (Doctor Who fans!) and I do happy dances when my students know Doctor Who. One awesome little nerdlet wore a Doctor Who shirt to school the other day, awesome! I love teaching nerdlets.
In honor of the new season of Doctor Who starting Saturday I did a Doctor Who themed photo for Selfy-Sunday.
There is a character on the show named River Song. I love River. She is awesome! She is feisty, she is sarcastic, she is viscous, and she is mysterious. I decided to try and pull off a River Song look.
The photo below is River Song.


I think it turned out pretty good! :-D
I took a little time out of my Sunday for my by-monthly Selfy-Sunday photo! Every two weeks, on G+, there is a Selfy-Sunday photography event. Sometimes there is a prompt or challenge to do, sometimes not. This time they were trying out a new submission system so that was the focus, no theme. So I gave myself a theme!
DOCTOR WHO! If you do not know Doctor Who then you need to go and educate yourself! Doctor Who is a show that started in the 1960's and has had a number of re-boots since then. The latest re-boot started in 2005 and it is AWESOME! A few years ago a couple friends of mine were shocked that we had never seen Doctor Who. They grabbed a couple seasons, shoved them at us, and told us we were not allowed back into their house until we've watched them! If we didn't like it, fine, but we needed to at least see it. We were hooked! And it turned out, I had seen the show before! When I was living in Scotland we had a little TV in the common area of our flat. It did not always work. But one time it DID and I watched a really interesting show, but was never able to figure out what I was watching. When we got a few seasons in I saw the episode that I had watched years earlier.
Now my husband and I convert others into Whovians (Doctor Who fans!) and I do happy dances when my students know Doctor Who. One awesome little nerdlet wore a Doctor Who shirt to school the other day, awesome! I love teaching nerdlets.
In honor of the new season of Doctor Who starting Saturday I did a Doctor Who themed photo for Selfy-Sunday.
There is a character on the show named River Song. I love River. She is awesome! She is feisty, she is sarcastic, she is viscous, and she is mysterious. I decided to try and pull off a River Song look.
The photo below is River Song.

I curled my hair and grabbed my jean jacket and white button up (usually reserved for my Harry Potter Luna Lovegood outfit!) and got ready for my photo. I grabbed a picture of the Tardis (The Doctor's time machine, Time And Relative Dimensions In Space) and edited it so that I could shop it in once I was done while my hair sat in curlers. I did my makeup a bit more understated and natural than usual, then grabbed my tripod and camera and ran out to my yard. My next door neighbor saw me taking a bunch of photos and yelled CHEESE at me, which almost made me break my, "Don't mess with me," face! I ran back in, edited it in Lightroom, then moved over to Pixelmator and added in the Tardis.
Below is my River Song!

I think it turned out pretty good! :-D
Thursday, August 30, 2012
4th of July!
Yes, this post is late, but that is because when I took the photos I was in the midst of the July Scavenger Hunt and many of these photos were contenders for my submissions! But now, here they are!


 |
| Pretty flowers in the garden |
 |
| Pretty flowers in the garden |


Monday, August 13, 2012
True Blood Cocktail

I love True Blood. It is a fantastic show! While watching the most recent episode of True Blood I decided I wanted to try and create a Tru Blood drink. I rummaged through my kitchen for a while and realized that I really need to go grocery shopping.
I brewed some of my favorite black cherry tea, which has an awesome deep red color, using just a little bit of water to make it really concentrated. I stuck the tea in the freezer with an ice cube to cool it down. Then in a cosmo glass I poured some grenadine for thickness and more red color. Once the tea was cold I poured that into the glass and I had a lovely, thick, deep red drink.
Once I had my drink I just had to take a picture of it! But the lighting in my house is awful! What to do?
Make a ghetto light box is what. This thing was... Lame-sauce. No, really.
I took an empty Coke can box and ripped it up a bit.
Then I took 4 pieces of computer paper and layered those into the box.
Finally I aimed my desk lamp down into the box.


Once I had my ghetto box I placed my drink in and snapped some photos.
As you can see, the lines of the paper are abundantly clear. And were ridiculous to try and edit out.

I gave up on trying to edit the lines of the paper out. I tried a new tactic. I threw the photo into Pixelmator (my Photoshop stand-in) and created three layers.
Layer one was the glass. I edited out everything but the glass.
Layer two was the shadow. I used the eyedropper tool to take the color from one of the original shadows and I used that with the paintbrush tool. I had the paintbrush on 50% opacity and went over the area in layers to create a gradient.
Layer three was the background. I used the color from the eyedropper tool and lightened it up to create the background color. If I had used plain white it would not have looked right with the background color in the rim of the glass.

Finally I threw the picture back to Lightroom and I softened up the edges and sharpened the image.
Friday, August 10, 2012
Layers in the Woods
In my last post I included a photo where my two ladies were in multiple places at once.
I decided a while ago I wanted to try photo manipulation. I threw the term into youtube and surfed through until I found a video on how to make yourself appear in multiple places at once. I decided that I wanted to try that at some point.
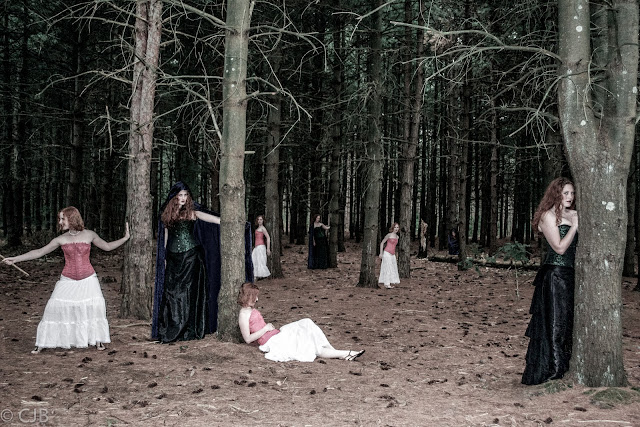
While out in the woods with my lovely models, Jill and Maggie, we came to a clearing with lots of trees and I thought that would make for an awesome picture, and an awesome chance to try out the multiple shot!
I took 12 photos to start off with. 1 of just the woods and 5 of each lady. And one extra of Jill because she wasn't sure what to do with her stick! The untouched photos are below.
I loaded all the photos into Pixelmator (my photoshop mac knockoff) and copy pasted them as separate layers in one photo. Only the top layer showed, of course.


Once all the photos were added and moved around I saved the file and moved over to Lightroom to retouch the colors.
In Lightroom I played around with some features. First I enhanced the colors, adjusted the highlights, shadows, the white, and the black. I enhanced the green and orange to make the colors pop more. Then I decided that I wanted to make it look more fantasy and creepy, so I brought down the vibrance of the photo.
This was my end product! I am pretty happy with it, I think it looks pretty good for my first ever try!
Here is my end product with the 10 shots!

I hope this was helpful for anyone interested in trying the multi-shot photo thing!
If you try it out let me know, send me a link!

I decided a while ago I wanted to try photo manipulation. I threw the term into youtube and surfed through until I found a video on how to make yourself appear in multiple places at once. I decided that I wanted to try that at some point.
While out in the woods with my lovely models, Jill and Maggie, we came to a clearing with lots of trees and I thought that would make for an awesome picture, and an awesome chance to try out the multiple shot!
I took 12 photos to start off with. 1 of just the woods and 5 of each lady. And one extra of Jill because she wasn't sure what to do with her stick! The untouched photos are below.
I loaded all the photos into Pixelmator (my photoshop mac knockoff) and copy pasted them as separate layers in one photo. Only the top layer showed, of course.
 |
| Just the woods |
 |
| This great dramatic pose by Maggie ends up covering up a cute one of Jill. |
 |
| I had to move this one of Maggie crouching to behind the fallen log because she covers herself up with a dramatic pose. |
 |
| This one gets lost in the myriad of photos around that middle tree. |
 |
| Maggie ends up covering up herself, obfuscating her crouching pose. |
 |
| This photo of Jill got covered up by Maggie's dramatic pose. |
 |
| I had to move Jill later on because she was blocking 3 shots here, but I loved the lost and confused look! |
 |
| I decided that I liked the sword fight below better, so I got rid of this one! |
 |
| Next time I want to avoid poses going off screen, this would be great more in the center, or with her facing the camera. |
To make each layer show up I had to start cutting. I used the lasso tool for this. I made sure the woods by themselves were my bottom layer, the order of the other photos didn't really matter yet, just that one. I selected each layer and cut out the background leaving just Maggie or Jill. As I did each layer they all gradually began showing up.
Below you can see the 5 layers of Jill and the 5 layers of Maggie.
 |
| 5 Jills, oh my! |
 |
| 5 Maggies peeking through the trees! |
When I put the Jill and Maggie layers all together I discovered that there were a couple instances where they were covering each other up, or covering themselves up.
 |
| The original 8 shots that I sent to Lightroom |
For example, in the Maggie picture above there were three problem shots. The one of Maggie on the left with her hood up covered up the one of Jill standing in the same trees with the cape on. This made me sad, I had to decide which to feature... though now that I am typing this and thinking about it I wonder if I could have repositioned Jill to be see poking around Maggie...
OK I just HAD to stop mid-blog to see if I could reposition so that all 5 photos can be seen. I originally moved 2 figures to make 4 of each be seen, now I have moved a few more and all of the photos can be seen.
So moving figures around is a bit touchy. Not only do you need to move them and trim right up to the edges of the figure so the background blends, you also have to resize them to make sure they are the right size for the perspective, and adjust the coloring because they have more light near the front of the image and less near the back of the image. Total noob that I am... I don't think I did the best job at that, but it is passable at least!!
 |
| I got to thinking, can I move even more figures to get all 10 in? Yes, yes I can. |
In Lightroom I played around with some features. First I enhanced the colors, adjusted the highlights, shadows, the white, and the black. I enhanced the green and orange to make the colors pop more. Then I decided that I wanted to make it look more fantasy and creepy, so I brought down the vibrance of the photo.
This was my end product! I am pretty happy with it, I think it looks pretty good for my first ever try!
Here is my end product with the 10 shots!

I hope this was helpful for anyone interested in trying the multi-shot photo thing!
If you try it out let me know, send me a link!
Subscribe to:
Posts (Atom)